You are here:
AppsAnywhere Build Guide
Jump to:
File/Folder Preparation
1
Open folder
Prior to performing an AppSet Capture it is useful to have all the necessary files gathered. We use a defined location and folder structure so that it is easy for any of FEAS-IT team to rebuild an AppSet.
- Open the \\feas-it-files.appsci.queensu.ca\appsanywhere share and open the AppSets folder.
2
Create software folder
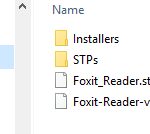
- Create a folder for the software package being requested. The folder should names for the package with no reference to the version number. There are sub-folders that should be created as well (See Fig 1 – AppSet Folder Structure).
- The STPs folder is where old stp files will be archived.
- The installers folder is where the software installers for the build will be stored. If the AppSet is for multiple pieces all installers should be stored here.
3
Copy the installer
VM Preparation
1
Open the client
To ensure that we do not interfere with each other’s captures, we will each have a set of capture VMs for our use. These will need to be created prior to performing the capture. When the master image for the pools is updated, new master images are created for the capture process. If there is not a clone of the AppsAnywhere Player Master and the AppsAnywhere Studio Master for your use please follow these steps:
- Open the vSphere client for Newton.appsci.queensu.ca
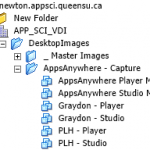
- Go to Inventory > VMs & Templates > APP_SCI_VDI > DesktopImages > AppsAnywhere – Capture
2
Clone the player master VM
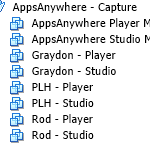
- Right click on AppsAnywhere Player Master and clone the vm.
- Name the new machine
[Name/initials] - Player(i.e. Rod – Player or PLH – Player) - Store the new vm in the same AppsAnywhere – Capture folder
- Customize using the Customization Wizard (unless you have already saved a customization specification)
- Name: Engineering & Applied Science
- Organization: Queen’s University
- NetBIOS Name should be the same as step 3.1 (with spaces removed)
- Workgroup: Engineering (do not join to domain)
- Save this customization for later use – name the same as step 3.1
- Name the new machine
3
Clone the studio master VM
- Right click on AppsAnywhere Studio Master and clone the vm.
- Name the new machine
[Name/initials] - Studio(i.e. Rod – Studio or PLH – Studio) - Store the new vm in the same AppsAnywhere – Capture folder
- Customize using the Customization Wizard (unless you have already saved a customization specification)
- Name: Engineering & Applied Science
- Organization: Queen’s University
- NetBIOS Name should be the same as step 4.1 (with spaces removed)
- Workgroup: Engineering (do not join domain)
- Save this customization for later use – name the same as step 4.1
- Name the new machine
4
Ensure they're renamed
- Boot both machines to ensure that they have been renamed.
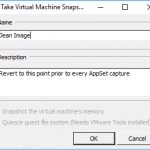
- Shutdown the vms and take snapshots – this will be the point that you revert to prior to every capture.
AppSet Capture
1
Revert snapshot
- Revert to clean image snapshot on your AppsAnywhere Studio vm.
- Power on the Studio vm.
2
Copy installer
- After you log on, copy the installers and any required files to the local drive of the VM (i.e. Downloads). It is not recommended to run the installers from the network during a capture. To mount the share you will need to use the following command:
net use \\feas-it-files.appsci.queensu.ca\AppsAnywhere /user:ad\NetIDto establish the connection, followed by
\\feas-it-files.appsci.queensu.ca\AppsAnywhereto open the window.
3
Launch Cloudpaging Studio
- Launch the Cloudpaging Studio
- Create a new project.
- The name should be the software package name (no versioning numbers included). For example: Foxit Reader, GIT, or Acrobat Pro.
4
Save project locally
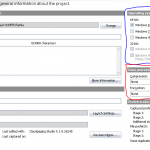
- Set the Operating system support checkboxes (almost always ours will be set to Windows 8 to 10 64bit).
- Set the Data processing Compression to None and Encryption to None
- Save the project locally (Desktop or Downloads). The file name should be the same as the package name, just replacing spaces with underscores.
5
Perform installation
- Perform the install capture
- Click the Capture button
- Point the capture tool at the File path for the installer.
- Set the capture settings – in most cases the defaults will suffice.
- Click Launch and go through the install steps for the software package.
6
Review files and run
- Check the install. Review the Files, Registry, Environment, Fonts, Startup and Services & Drivers tabs for the changes that were captured during the install.
- Perform the run capture.
- Click the Capture button
- Point the capture tool at the installed executable for the application.
- When the application launches make any configuration changes you want captured (i.e. turn off updates).
- Close the application and stop the capture.
7
Review the changes
- Again review the capture changes.
- Configure the Launch Settings
- Select the executable command line
- Set the working folder
- Set the icon source file
8
Save package
- Save the package
- Cloudify the package
- Set the output file name — it should match the STW name set in step 6 but here the version numbers should be added. The STP file cannot include . (dots) in the filename. The naming convention to use is underscores to replace spaces and dashes to separate version numbers. i.e.
Foxit_Reader_v9-5-0. - Set the save location to be the folder you created/copied the STW file.
- Check the Finalize into STP format checkbox.
- Click OK
- Wait for the build to complete.
- Set the output file name — it should match the STW name set in step 6 but here the version numbers should be added. The STP file cannot include . (dots) in the filename. The naming convention to use is underscores to replace spaces and dashes to separate version numbers. i.e.
9
Prepare folder
- Copy the STW and STP file to the prepared folder on
\\FEAS-IT-Files.appsci.queensu.ca\AppsAnywhere\AppSets - The capture is complete — move on to initial app testing.
Created On
Last Updated On

